
Track Meta Pixel Events in Matomo Tag Manager
Meta Pixel events let you measure the actions that visitors take on your website after interacting with your Facebook or Instagram advertising. By tracking events such as purchases, registrations, and contact form submissions, you can measure conversions, build audiences, and optimise your advertising campaigns in Meta.
How Meta Pixel events work
After you have configured the Facebook Pixel tag in Matomo Tag Manager, you can track additional visitor interactions by sending Meta standard events.
When a visitor performs an action on your website, such as clicking a button, submitting a form, or completing a purchase, Matomo Tag Manager can trigger a Custom HTML tag that calls the Meta Pixel JavaScript API (fbq) to send the appropriate event to Meta.
Meta recognises a predefined set of standard events that can be used for conversion tracking, audience building, and ad optimisation. Read the specifications for Meta pixel standard events.
This guide explains how to track these events with Matomo Tag Manager. The setup uses the Facebook Pixel tag and a new Custom HTML tag to send standard Meta events when your visitors from Facebook or Instagram perform specific actions on your website.
Before you begin
Ensure the following prerequisites are in place:
- You will need admin access to a Meta Business account and created the Meta Pixel in Meta Events Manager.
- Matomo Tag Manager should be installed on your website and successfully tracking page views.
- The Facebook Pixel tag must be configured in Matomo Tag Manager.
Create or identify the Meta event
Before configuring Matomo Tag Manager, decide which Meta standard event you want to report, such as Lead or Purchase.
If you are unsure which event to use, or want to configure your website using Meta’s guided setup:
- Open Meta Events Manager > Overview.
- Click Setup events or Add Events to launch the Event Setup Tool.
- The Event Setup Tool lets you browse your website and select buttons or other interactive elements. For example, if visitors click on the form’s
Sendbutton to submit, assign the Lead event to theSendbutton.
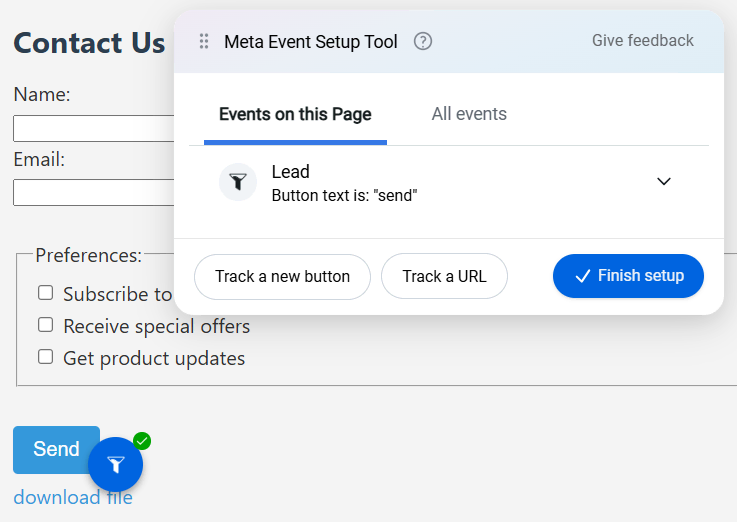
Next, you will need to configure Matomo Tag Manager to send the same Meta event when the equivalent visitor action occurs.
Configure a trigger
Create a trigger for the visitor action that should send the Meta event. This trigger will be assigned to the new Custom HTML tag created later.
The trigger should match the same interaction you identified in the Meta Event Setup Tool. For example, if you associated the Lead event with a contact form’s Send button, configure Matomo Tag Manager to fire when that form is submitted or when the Send button is clicked.
- Open your Tag Manager container and go to Triggers.
- Click Create New Trigger and select the Form Submit trigger.
- Choose one of the following trigger types (for example):
- Form Submit fires when the contact form is successfully submitted. You can optionally restrict the trigger to a specific form using its name or ID.
- All Elements Click fires when the visitor clicks the Send button. Restrict the trigger to the required button using a click attribute, such as its ID, class, or text.
- Click Create New Trigger to save.
Create a Custom HTML tag
- Go to Tags and click Create New Tag.
- Select the Custom HTML tag and provide a descriptive tag name.
- Select the trigger created previously, for example, Form Submit trigger.
- In the Custom HTML field, enter the Meta Pixel event code. For example, to send a Lead event:
<script>
fbq('track', 'Lead');
</script>
Many Meta events support optional parameters that provide additional context, such as a Purchase event:
<script>
fbq('track', 'Purchase', {
    value: 249.99,
    currency: 'USD'
});
</script>
If your website exposes values such as the order total or currency through the data layer or JavaScript, first create the corresponding data layer variables in Matomo Tag Manager. You can then reference those variables in the event code:
fbq('track', 'Purchase', {
    value: {{Order Total}},
    currency: '{{Currency}}'
});
Save the new tag and verify the tracking configuration before publishing the container to your live site.
Test Meta Pixel event tracking
- Open your browser’s developer tools and enable Preview / Debug mode in Tag Manager.
- Perform the action you are tracking, such as submitting the contact form.
- Check the Facebook Pixel tag and the Custom HTML tag fires.
- In developer tools > Network tab, filter requests by:
facebookortr. - You should see a request similar to:
https://www.facebook.com/tr/?id=<PIXEL_ID>>&ev=Leador
https://www.facebook.com/tr/?id=<PIXEL_ID>&ev=Purchase - The
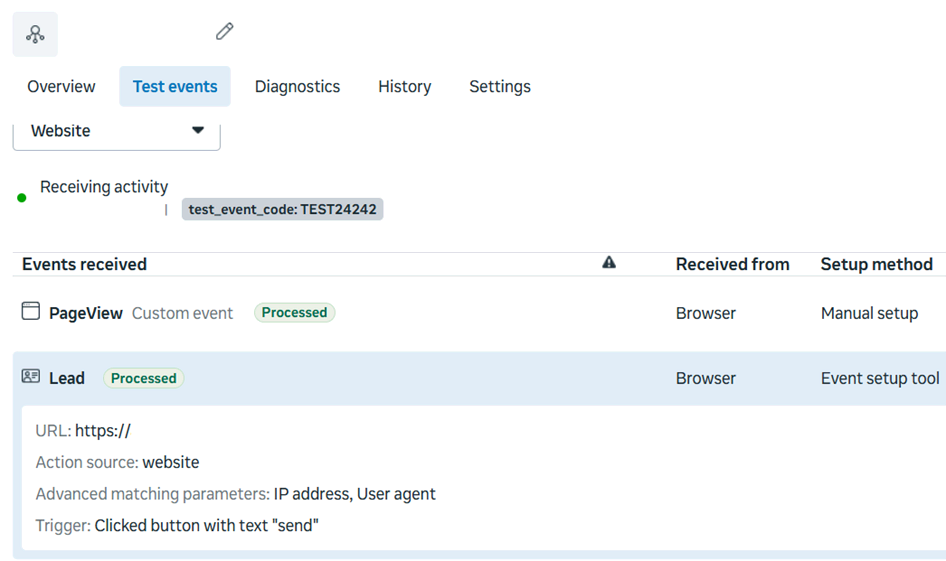
evparameter should match the event configured in your Custom HTML tag. - To check the page view is recorded in Meta, open your Meta Events Manager > Datasets.
- Select your Meta Pixel.
- Open Test Events and confirm that the event appears.
Troubleshooting
If you do not see any events in Meta, check the following is setup correctly:
- The event is defined correctly in Meta.
- The Facebook Pixel tag is configured and successfully tracking page views.
- The container with the Facebook Pixel tag and new Custom HTML tag has been published to your production environment.
- In Matomo Preview / Debug mode, verify the triggers and tags fire when expected.
- Ensure your browser is not blocking tracking requests.
Next steps
Once the Meta Pixel is tracking the configured event, you can repeat the setup steps to create additional Meta standard events, such as ViewContent or AddToCart, and verify each event in Meta Events Manager.