
Integrate Silktide consent manager CMP with Matomo
This guide provides general technical implementation advice. It does not constitute legal advice. Consult with a qualified privacy professional to ensure full compliance with applicable laws.
Website owners are responsible for their website’s compliance with privacy laws. This includes responsibility for collecting and retaining a log of their visitors’ valid tracking consents where required.
A Consent Management Platform (CMP) helps website owners manage visitor consent for cookie-based and cookieless tracking. It typically presents visitors with a consent banner explaining data processing activities and allows them to accept or decline specific purposes, such as Analytics or Marketing.
You can integrate a consent manager with Matomo using the Matomo tracking code or Matomo Tag Manager.
Matomo supports three tracking approaches, depending on your organisation’s legal requirements and tracking needs:
- Opt-out Tracking for CNIL Exemption: For organisations relying on the CNIL consent exemption for website analytics, limited tracking is permitted, provided that conditions of exemption are met and users are offered a clear opt-out mechanism. Refer to the integration guide on how to configure a consent manager to opt-out tracking with CNIL compliance enabled.
Note: Refer to the integration guide, Configure CNIL exemption opt-out tracking with a consent manager (CMP). - Consent-based Tracking: For websites targeting users in countries that require prior consent for use of cookies and similar technologies for analytics and marketing (for example, most or EU and EEA countries), enable cookieless or cookie-based Matomo tracking only after obtaining visitor consent.
- Adaptive Tracking: For websites operating outside the EU/UK/EEA, in countries where prior consent is either not required or only required when the analytics processes personal data, you can enable cookie-based tracking with consent and fallback to cookieless tracking if consent is not given (unless the visitor opts out of all tracking).
This guide explains how to configure Consent-based tracking and Adaptive tracking using the Matomo tracking code. If you are using Tag Manager, follow the Silktide and Matomo Tag Manager integration guide.
Before you start
- Complete the necessary steps to configure your Silktide cookie banner in line with the consent method used and the legal requirements that apply to your website.
- Ensure the consent type for
Analyticsis enabled. - To install the script displayed in Silktide’s Installation Instructions, copy the entire script into your website’s
<head>tag. Keep its stylesheet, external JavaScript file, style overrides, andwindow.silktideConsentManager.init({...})call together.
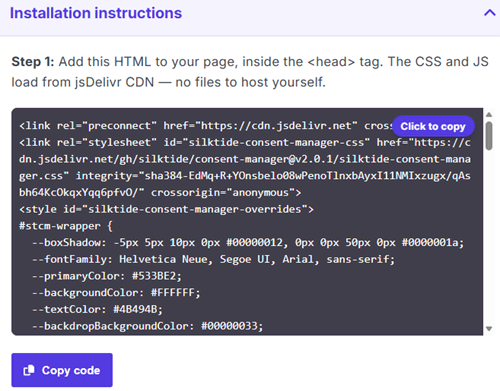
- Add it only once on each page where the banner should appear. The Silktide script must load before the
init()call.
Modify the Silktide install script
- Find the
Analyticscategory inside your existinginit({...})configuration. - Check the consent category is set as
required: false, which allows visitors to reject consent.
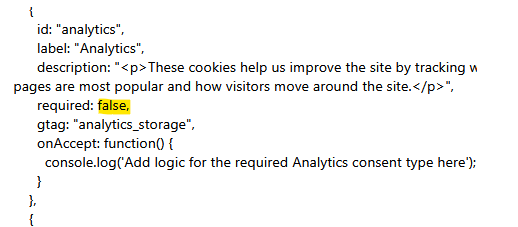
- Add the
onAccept: function()below the consent category settings:
required: false,
// Add the function
onAccept: function() {
  updateMatomoTrackingConsent(true);
},
onReject: function() {
  updateMatomoTrackingConsent(false);
}
Method 1: Consent-based Tracking
In regions with strict privacy and ePrivacy laws, such as the EU or UK, websites must obtain explicit consent before collecting analytics data. Consent-based tracking ensures that no tracking occurs until a website visitor actively provides consent.
This method can operate in either cookieless (JavaScript-based) or cookie-based mode, but tracking is only activated after the visitor gives consent. When consent is revoked or denied, any existing Matomo cookies are removed from the visitor’s browser and tracking stops.
Install and modify the Matomo tracking code
- To install the tracking code, go to Administration
 > Websites (or Measurables) > Tracking Code and select the website you want to track.
 - Copy the tracking code shown and paste into a text editor.
- Insert the line
_paq.push(['requireConsent']);before_paq.push(['trackPageView']). - Paste the modified tracking code inside the
<head>tag on all the website pages you are tracking. - If you already have the Matomo tracking code on the page, replace it with the updated tracking code:
<!-- Matomo -->
<!-- SAMPLE CODE - DO NOT COPY THIS -->
<!-- COPY THE TRACKING CODE FROM YOUR MATOMO DASHBOARD -->
<script>
  var _paq = window._paq = window._paq || [];
  _paq.push(['requireConsent']);
  _paq.push(['trackPageView']);
  _paq.push(['enableLinkTracking']);
  (function() {
    var u="//matomo/";
    _paq.push(['setTrackerUrl', u+'matomo.php']);
    _paq.push(['setSiteId', '1']);
  })();
</script>
<script src="//matomo/matomo.js"></script>
<!-- End Matomo Code -->
Install the Matomo consent handling script
Add the following function in the <script> element before your Silktide init({...}) call to ensure it is available when the consent callbacks run.
This connects the visitor’s Silktide consent choice to Matomo. When Analytics is accepted, it allows tracking. When consent is denied or withdrawn, it calls forgetConsentGiven so Matomo stops tracking.
<script>
  function updateMatomoTrackingConsent(accepted) {
  window._paq = window._paq || [];

  if (accepted) {
    window._paq.push(['setConsentGiven']);
  } else {
    window._paq.push(['forgetConsentGiven']);
  }
}
window.silktideConsentManager.init({

  // Keep your existing generated configuration.
});
</script>
Test consent-based tracking
After completing the configuration, test the setup to confirm that Matomo responds correctly when visitors accept or reject Analytics.
- To test the tracking behaviour for multiple regions, use a VPN during testing to simulate different locations.
- Open your website and use the CMP widget to decline consent.
- Perform some test actions and check your activity was not recorded in Visitors > Real-time report.
- Use the browser’s developer tools and view the Network tab to check no tracking requests were sent.
- Grant consent, perform test actions and view the Real-time report and Network tab to confirm tracking requests are now sent.
Method 2: Adaptive Tracking
The Adaptive Tracking method can be used in regions where prior consent for analytics cookies or other trackers:
- are not legally required (but you want to minimise the data you collect),
- are not required for pseudonymised non-sensitive personal data or
- are only required if certain personal data is processed.
You can minimise the data you collect by configuring the Matomo privacy settings.
This method allows tracking to begin immediately in cookieless mode, with the option to request consent for cookie-based tracking. When the website visitor provides consent, tracking switches to cookie-based mode. If consent is denied or later revoked, tracking continues in cookieless mode.
Install and modify the Matomo tracking code
- To install the tracking code, go to Administration > Websites (or Measurables) > Tracking Code and select the website you want to track.
- Copy the tracking code shown and paste into a text editor.
- Insert the line
_paq.push(['requireCookieConsent']);before_paq.push(['trackPageView']). - Paste the modified tracking code inside the
<head>tag on all the website pages you are tracking. - If you already have the Matomo tracking code on the page, replace it with the updated tracking code:
<!-- Matomo -->
<!-- SAMPLE CODE - DO NOT COPY THIS -->
<!-- COPY THE TRACKING CODE FROM YOUR MATOMO DASHBOARD -->
<script>
  var _paq = window._paq = window._paq || [];
  _paq.push(['requireCookieConsent']);
  _paq.push(['trackPageView']);
  _paq.push(['enableLinkTracking']);
  (function() {
    var u="//matomo/";
    _paq.push(['setTrackerUrl', u+'matomo.php']);
    _paq.push(['setSiteId', '1']);
  })();
</script>
<script src="//matomo/matomo.js"></script>
<!-- End Matomo Code -->
Install the Matomo cookie consent handling script
Add the following function in the <script> element before your Silktide init({...}) call to ensure it is available when the consent callbacks run.
This function connects the visitor’s Silktide cookie choice to Matomo. When Analytics cookies are accepted, it allows Matomo to use tracking cookies. When cookies are rejected or consent is withdrawn, it calls forgetCookieConsentGiven and deleteCookies to remove Matomo tracking cookies. Matomo may continue tracking without cookies if your configuration permits cookieless tracking.
<script>
  function updateMatomoCookieConsent(accepted) {
  window._paq = window._paq || [];

  if (accepted) {
    window._paq.push(['setCookieConsentGiven']);
  } else {
    window._paq.push(['forgetCookieConsentGiven']);
    window._paq.push(['deleteCookies']);
  }
}
window.silktideConsentManager.init({
  // Keep your existing generated configuration.
});
</script>
Test adaptive tracking
After completing the configuration, test the setup to confirm that Matomo responds correctly when visitors accept or reject Analytics.
- To test the tracking behaviour for multiple regions, use a VPN during testing to simulate different locations.
- Open your website and use the CMP widget to decline cookie consent.
- Use the browser’s developer tools and view the Application or Storage > Cookies tab to confirm cookies were not set.
- In the Visitors > Real-time report, check that tracking requests are still sent.
- Grant then revoke consent and confirm cookies were set then removed as expected.
This simple test confirms that the integration correctly respects regional privacy requirements and only uses cookies after consent is granted.
Disclaimer: The use of any third-party tools (plugins, extensions, platforms, APIs, widgets, etc.) is at your own risk. Matomo does not own, control, maintain or support any third-party tools that integrate with our product. We recommend checking your privacy setup is correctly configured across your environment when using any third-party tools.