How to integrate Klaro Cloud CMP with Matomo
This guide provides general technical implementation advice. It does not constitute legal advice. Consult with a qualified privacy professional to ensure full compliance with applicable laws.
Website owners are responsible for their website’s compliance with privacy laws. This includes responsibility for collecting and retaining a log of their visitors’ valid tracking consents where required.
A Consent Management Platform (CMP) is a tool that helps website owners ensure compliance with privacy laws by managing visitor consent for cookie-based or cookieless tracking. It presents website visitors with a consent banner explaining data processing activities and allows them to accept or decline specific purposes, such as analytics or marketing.
Klaro Cloud CMP integration with Matomo can be implemented using the Matomo JavaScript tracking code or Matomo Tag Manager. The Matomo Tag Manager method is covered in a separate guide. This guide focuses on three integration methods using the Matomo tracking code.
Each method is based on different regulatory requirements, so it is important to consider your organisation’s legal obligations and tracking needs when integrating the CMP:
-
Consent-based Tracking: For websites targeting users in countries that require prior consent for use of cookies and similar technologies for analytics and marketing (for example, most or EU and EEA countries), enable cookieless or cookie-based Matomo tracking only after obtaining visitor consent.
-
Opt-out Tracking for CNIL Exemption: For organisations relying on the CNIL consent exemption for website analytics, limited tracking is permitted, provided that conditions of exemption are strictly met and users are offered a clear opt-out mechanism. CNIL exemption is strict and if any conditions of the CNIL exemption are not met, consent is also required.
-
Adaptive Tracking: For websites operating outside the EU/UK/EEA, in countries where prior consent is either not required or only required when the analytics processes personal data, you can enable cookie-based tracking with consent and fallback to cookieless tracking if consent is not given (unless the visitor opts out of all tracking).
Before you start
Set up Klaro CMP
- Create your Klaro Cloud account.
- Complete the necessary steps to configure your Privacy Manager and cookie banner in line with the consent method used and the legal requirements that apply to your website.
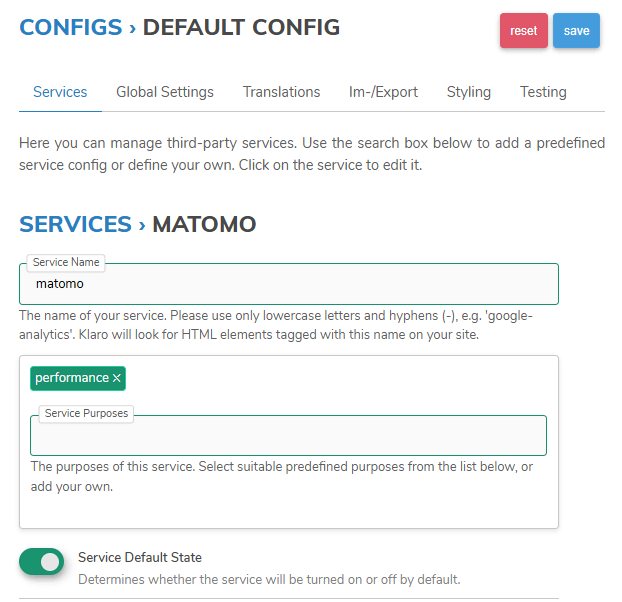
- In your Klaro dashboard, you will need to add the Matomo service. Go to the Configuration tab > Default Config (or choose a custom one if required).
- In the Add a service field, type Matomo and select it to add the service.
- Click on the Matomo service to configure the settings.
- Select Performance Optimization as the Service Purpose.
- Set Service Default State to On.
- Add three cookies with the definition entered as a regular expression:
- cookie1:
/^pk.*$/ - cookie2:
/^mtm.*$/ - cookie3:
/^MATOMO.*$/
- cookie1:
- Save the service.
- Follow the Klaro CMP instructions to add the consent manager script directly to your website’s code. The script must be placed as the first element inside the
<head>tag on every webpage you want to track.
Method 1: Consent-based Tracking
In regions with strict privacy and ePrivacy laws, such as the EU or UK, websites must obtain explicit consent before collecting analytics data. Consent-based tracking ensures that no tracking occurs until a website visitor actively provides consent.
This method can operate in either cookieless (JavaScript-based) or cookie-based mode, but tracking is only activated after the visitor gives consent. When consent is revoked or denied, any existing Matomo cookies are removed from the visitor’s browser and tracking stops.
Install and modify the Matomo tracking code
- If you do not have the tracking code installed yet, go to Matomo > Administration
 > Websites > Tracking Code and select the website you want to track.
 - Copy the tracking code shown in the code box and paste into a text editor.
- Insert the line
_paq.push(['requireConsent']);before_paq.push(['trackPageView']). - Paste the modified tracking code inside the
<head>tag on all the website pages you are tracking. - If you already have the Matomo tracking code on the page, replace it with the updated tracking code:
<!-- Matomo -->
<!-- SAMPLE CODE - DO NOT COPY THIS -->
<!-- COPY THE TRACKING CODE FROM YOUR MATOMO DASHBOARD -->
<script>
  var _paq = window._paq = window._paq || [];
  _paq.push(['requireConsent']);
  _paq.push(['trackPageView']);
  _paq.push(['enableLinkTracking']);
  (function() {
    var u="//matomo/";
    _paq.push(['setTrackerUrl', u+'matomo.php']);
    _paq.push(['setSiteId', '1']);
  })();
</script>
<script src="//matomo/matomo.js"></script>
<!-- End Matomo Code -->
Install the Matomo consent handling script
The following script listens for consent updates and enables/disables tracking when consent is granted/denied. Add the consent handling script inside the <head> tag on all website pages that contain the Matomo tracking code.
<script>
    function KlaroWatcher() {};
    KlaroWatcher.prototype.update = function(obj, name, data) {
      if (data !== 'undefined' && data.hasOwnProperty('matomo')) {
        if (data.matomo) {
          _paq.push(['rememberConsentGiven']);
          _paq.push(['setConsentGiven']);
        } else {
          _paq.push(['forgetConsentGiven']);
        }
      }
    };
    window.kw = new KlaroWatcher();

    var waitForTrackerCount = 0;
    function matomoWaitForTracker() {
      if (typeof _paq === 'undefined' || typeof klaro === 'undefined') {
        if (waitForTrackerCount < 40) {
          setTimeout(matomoWaitForTracker, 250);
          waitForTrackerCount++;
          return;
        }
      } else {
        klaro.getManager().watch(kw);
      }
    }
    document.addEventListener('DOMContentLoaded', matomoWaitForTracker());
</script>
Validate the integration
Once you have installed the Matomo tracking code and added the consent handling script to your website, you can test the tracking behaviour for different regions to validate your privacy compliance setup.
- Open your website and use the CMP widget to decline tracking consent.
- In your Matomo instance, select the Visitors > Real-time report, and check that no tracking requests are sent.
- Next, grant consent and verify that tracking starts in your Matomo instance.
- If using cookie-based tracking, open the browser’s developer tools and view the Application or Storage > Cookies tab to confirm cookies were set.
- Reset your consent and decline tracking consent.
- Perform some test actions and check your activity was not recorded in the Real-time report.
This simple test confirms that the integration correctly respects regional privacy requirements and only activates tracking after consent is granted.
Method 2: Opt-out Tracking (CNIL Exemption)
The French supervisory authority, the Commission nationale de l’informatique et des libertés (CNIL) permits certain forms of website analytics to be used without prior consent, provided that strict conditions are met. This is commonly referred to as CNIL consent exemption for audience measurement tools. Our self-assessment against CNIL consent-exemption criteria can be found here.
Organisations relying on the CNIL consent exemption can track website visitors by default provided that all exemption conditions are met.
Note: To comply with this exemption, you must implement the necessary settings in Matomo to ensure data collection remains privacy-friendly and adheres to CNIL’s guidelines.
Refer to the Matomo Analytics Configuration Guide and Self-Assessment as required for CNIL consent-exemption (English version or French version).
While CNIL’s exemption is specific to France, supervisory authorities in a small number of other EU countries have also exempted narrow scope of website analytics from consent (with opt-out right). The Opt-out tracking method can also be used in the context of those exemptions, if Matomo is configured in line with the specific requirements. Refer to the ePrivacy Directive overview, National Implementations, and Matomo’s Website Analytics Guide for details.
Configure the Consent Manager
To configure tracking under the CNIL exemption (opt-out model), it’s important to assess whether your site qualifies for this setup. Consult with your data privacy officer or legal team before relying on the CNIL exemption.
If you fully comply with CNIL’s criteria for exempt audience measurement tools, there are different approaches you can take to integrate with your consent manager platform (CMP).
- Your website targets visitors in countries where CNIL or very similar exemption exists (e.g., France, Spain, Italy), or you have an establishment in such countries:
- Configure your CMP to start tracking without prior consent. In the Klaro
config.jsfile, you can setoptOut: trueand Klaro loads the service before consent is given. - The CMP banner must clearly inform users about the use of consent exempt website analytics tracking and include a visible and easily accessible opt-out mechanism (e.g. a link to your privacy policy with an opt-out checkbox).
- Configure your CMP to start tracking without prior consent. In the Klaro
- If your website serves a broader audience that targets visitors from countries that require prior consent for cookie based or cookieless website analytics (e.g. most of EU countries):
- Consider splitting your banner configuration if the CMP supports region-specific geotargeting and consent rules.
- Follow the steps in this guide, How to include a web analytics opt-out feature on your site to add the embedded Matomo opt-out form to your website. The form includes all required JavaScript to allow users to opt-out of tracking.
- Alternatively, you can create a custom opt-out form using HTML and JavaScript, as explained in this developer guide.
Validate the integration
Once configured, test the tracking behaviour and validate your privacy compliance setup.
- Perform test actions on your website and view the Visitors > Real-time report to verify tracking requests are sent to Matomo.
- Select to opt-out of tracking.
- Open the browser’s developer tools and view the Application or Storage > Cookies tab to verify that the
mtm_consent_removedcookie is set. - Perform test actions on your website and view Visits in Real-time report to ensure no tracking requests are sent to Matomo after opting out.
- Change the settings to opt back in and resume tracking.
- Perform test actions on your website and view the Visits in Real-time report to ensure tracking requests are sent to Matomo.
This test confirms that the integration respects the user’s choice to opt out and behaves in accordance with CNIL’s exemption criteria.
⚠️ If you use Matomo features like Heatmaps, User ID, Ecommerce, Advertising Conversion, or Session Recording, or you want to access or export raw data you must switch to Method 1 (Consent-based Tracking), as these features fall outside the exemption.
Method 3: Adaptive Tracking
The Adaptive Tracking method can be used in regions where prior consent for analytics cookies or other trackers:
- are not legally required (but you want to minimise the data you collect),
- are not required for pseudonymised non-sensitive personal data or
- are only required if certain personal data is processed.
You can minimise the data you collect by configuring the Matomo privacy settings.
This method allows tracking to begin immediately in cookieless mode, with the option to request consent for cookie-based tracking. When the website visitor provides consent, tracking switches to cookie-based mode. If consent is denied or later revoked, tracking continues in cookieless mode.
Install and modify the Matomo tracking code
- If you do not have the tracking code installed yet, go to Matomo > Administration > Websites > Tracking Code and select the website you want to track.
- Copy the tracking code shown in the code box and paste into a text editor.
- Insert the line
_paq.push(['requireCookieConsent']);before_paq.push(['trackPageView']). - Paste the modified tracking code inside the
<head>tag on all the website pages you are tracking. - If you already have the Matomo tracking code on the page, replace it with the updated tracking code:
<!-- Matomo -->
<!-- SAMPLE CODE - DO NOT COPY THIS -->
<!-- COPY THE TRACKING CODE FROM YOUR MATOMO DASHBOARD -->
<script>
  var _paq = window._paq = window._paq || [];
  _paq.push(['requireCookieConsent']);
  _paq.push(['trackPageView']);
  _paq.push(['enableLinkTracking']);
  (function() {
    var u="//matomo/";
    _paq.push(['setTrackerUrl', u+'matomo.php']);
    _paq.push(['setSiteId', '1']);
  })();
</script>
<script src="//matomo/matomo.js"></script>
<!-- End Matomo Code -->
Install the Matomo cookie consent handling script
The following script listens for consent updates and enables/removes cookies when cookie consent is granted/denied. Add the consent handling script inside the <head> tag on all website pages that contain the Matomo tracking code.
<script>
    function KlaroWatcher() {};
    KlaroWatcher.prototype.update = function(obj, name, data) {
      if (data !== 'undefined' && data.hasOwnProperty('matomo')) {
        if (data.matomo) {
          _paq.push(['rememberCookieConsentGiven']);
          _paq.push(['setCookieConsentGiven']);
        } else {
          _paq.push(['forgetCookieConsentGiven']);
          _paq.push(['deleteCookies']);
        }
      }
    };
    window.kw = new KlaroWatcher();

    var waitForTrackerCount = 0;
    function matomoWaitForTracker() {
      if (typeof _paq === 'undefined' || typeof klaro === 'undefined') {
        if (waitForTrackerCount < 40) {
          setTimeout(matomoWaitForTracker, 250);
          waitForTrackerCount++;
          return;
        }
      } else {
        klaro.getManager().watch(kw);
      }
    }
document.addEventListener('DOMContentLoaded', matomoWaitForTracker());
</script>
Validate the integration
Once you have installed the Matomo tracking code and added the consent handling script to your website, you can test the tracking behaviour for different regions to validate your privacy compliance setup.
- Open your website and use the CMP widget to decline cookie consent.
- Use the browser’s developer tools and view the Application or Storage > Cookies tab to confirm cookies were not set.
- In the Visitors > Real-time report, check that tracking requests are still sent.
- Next, grant / revoke consent and confirm cookies were set / removed as expected.
This simple test confirms that the integration correctly respects regional privacy requirements and only uses cookies after consent is granted.
Disclaimer: The use of any third-party tools (plugins, extensions, platforms, APIs, widgets, etc.) is at your own risk. Matomo does not own, control, maintain or support any third-party tools that integrate with our product. We recommend checking your privacy setup is correctly configured across your environment when using any third-party tools.