How to export data from Matomo On-Premise to Google BigQuery
If you need a scalable solution for reporting and integration with external systems, you can export your Matomo On-Premise data to a data warehouse platform, like Google BigQuery. This can offer faster querying over large datasets for advanced analytics and integrated business intelligence workflows.
This guide explains how to export raw tracking data from Matomo On-Premise (MySQL or MariaDB database) and import it into Google BigQuery using buckets in Google Cloud Storage.
Before you start
Ensure the following prerequisites are met before beginning the export process. Note that using Google Cloud services such as Cloud Storage and BigQuery involves billable components that you will need to monitor and manage in your Google Cloud account.
- Access to your Matomo On-Premise database
You must be able to connect to the Matomo MySQL or MariaDB database, either locally or remotely with permissions to query and export data (raw tracking data such as visits, actions, and custom dimensions). - A Google Cloud project with BigQuery
You will need a Google Cloud account with BigQuery, and permissions to setup storage buckets, create datasets and manage data transfers. Ensure the BigQuery API and the BigQuery Data Transfer API are enabled. - Familiarity with SQL and database export tools
It is recommended to have basic knowledge on running SQL queries, accessing tables, and exporting data when working directly with the Matomo database and preparing data for import into BigQuery.
Note: The exported data will be governed by the applicable Google Terms and policies. Make sure you are aware of your obligations under these terms and policies, and review any additional privacy and consent requirements.
Step 1: Identify Matomo tables for BigQuery
First identify the Matomo tables that you need to create in BigQuery. Review which tables are relevant to your analysis goals and the features you use in Matomo.
Recommended tables for all users
- log_action: Stores unique action entries such as page URLs, page titles, downloads, and event names. This table links actions to visits.
- log_link_visit_action: Links data from the
log_visitandlog_actiontables. - log_visit: Contains all visit data for your site.
- site: Contains metadata about your site.
- log_conversion: Contains data on conversions.
- goal: Stores data relating to the Goal Tracking feature. If you don’t use this feature you can safely ignore this table.
Optional tables (for features in use)
If you do not use the related feature, you can safely ignore the optional table.
- funnel: Stores data for the Funnels feature.
- log_abtesting: Stores data for the AB Testing feature.
- log_clickid: Contains data relating to the Advertising Conversion Export feature.
- log_conversion_item: Contains data on Ecommerce items as part of Ecommerce tracking.
- log_form: Stores data for the Form Analytics feature.
- log_form_field: Contains data relating to the Form Analytics feature.
- log_form_page: Contains data relating to the Form Analytics feature.
- log_hsr: Stores data for the Heatmaps and Session Recording feature.
- log_hsr_blob: Contains data relating to the Heatmaps and Session Recording feature.
- log_hsr_event: Contains data relating to the Heatmaps and Session Recording feature.
- log_hsr_site: Contains data relating to the Heatmaps and Session Recording feature.
- log_media: Stores data for the Media Analytics feature.
- log_media_plays: Contains data relating to the Media Analytics feature.
- site_form: Contains data relating to the Form Analytics feature.
If you aren’t sure exactly which tables you need to include, you can set up imports for all of them. Any tables that are not used will simply appear empty within your data warehouse as they would in your Matomo database.
Note: For each table identified for export, you will need to create a matching table in BigQuery using a JSON schema file.
Step 2: Create JSON schema files for the Matomo tables
In this step, you need to prepare your table schemas that will be used to create the corresponding table in BigQuery using JSON format. The JSON schema defines the table structure and column types in a format that BigQuery can read when creating the table.
- A simple way to do this is to copy your existing table schema from MySQL or MariaDB and convert it into BigQuery’s JSON format.
- For example, if using MySQL Workbench, right click on the table
log_actionand select Copy to Clipboard > Create Statement. - Paste the SQL format into an editor to view the column names and their MySQL data types.
CREATE TABLE `log_action` (
  `idaction` int(10) unsigned NOT NULL AUTO_INCREMENT,
  `name` text NOT NULL,
  `hash` int(10) unsigned NOT NULL,
  `type` tinyint(3) unsigned DEFAULT NULL,
  `url_prefix` tinyint(2) unsigned DEFAULT NULL,
  PRIMARY KEY (`idaction`)
) ENGINE=InnoDB;
 and convert the SQL format to JSON.
Next, translate the MySQL types into JSON and save the JSON schema file.
For example (based on the log_action SQL structure shown above):
[
  {"name": "idaction", "type": "INTEGER"},
  {"name": "name", "type": "STRING"},
  {"name": "hash", "type": "INTEGER"},
  {"name": "type", "type": "INTEGER"},
  {"name": "url_prefix", "type": "INTEGER"}
]
Note: You will need to create JSON schema files for every Matomo table needed in BigQuery. Read the detailed developer documentation on the Matomo database schema.
Step 3: Create the Matomo dataset in BigQuery
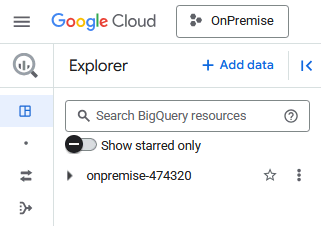
Once you prepared the JSON schemas for the required Matomo tables, go to your Google Cloud Console account and open BigQuery.
-
In Google Cloud, open or create a Project linked to a billing account.
-
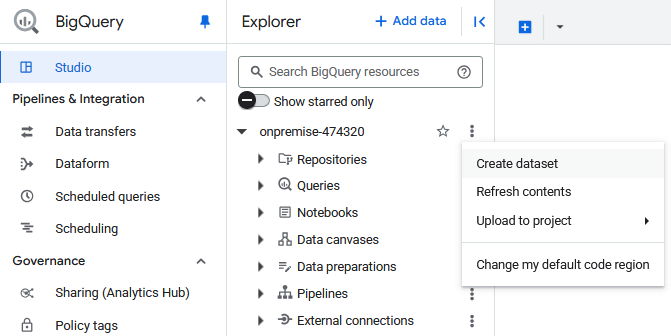
In Explorer, click on the three dots and select Create dataset from the sub-menu.
-
Provide a Dataset ID (name). The Matomo tables will be created in this dataset.
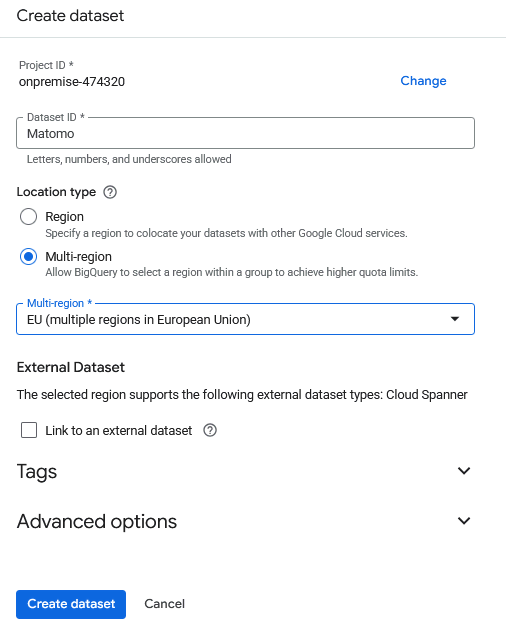
-
Choose the Location type. BigQuery stores the dataset’s tables in that location, and future jobs, external connections, and costs are tied to it. The region should match your data-residency policy and be closest to where you will load/query data to reduce egress and latency.
- Click Create dataset to save it in your BigQuery project.
Step 4: Create the Matomo tables in BigQuery
With the dataset set up, you can now create the Matomo tables.
- In Google Cloud Explorer, click on the three dots next to the newly-created dataset and select Create table from the sub-menu.
- For the option Create table from, select Empty Table.
- Select the right Project and Dataset.
- Provide a name for the Table. For clarity, use the same table name in BigQuery as it is named in the Matomo database.
- Toggle the Schema option to enable Edit as text.
- Open the JSON schema file you created previously for this table. Copy the schema and paste it into the Schema text field.

- Click Create Table to save the new table.
- Create the rest of the Matomo tables as needed in BigQuery.
Step 5: Set up a bucket in Google Cloud Storage
Before importing your table data, you need to set up a bucket in Google Cloud Storage that will store the data exported from your Matomo database.
- In the Google Cloud Console, open Storage > Buckets and click Create.
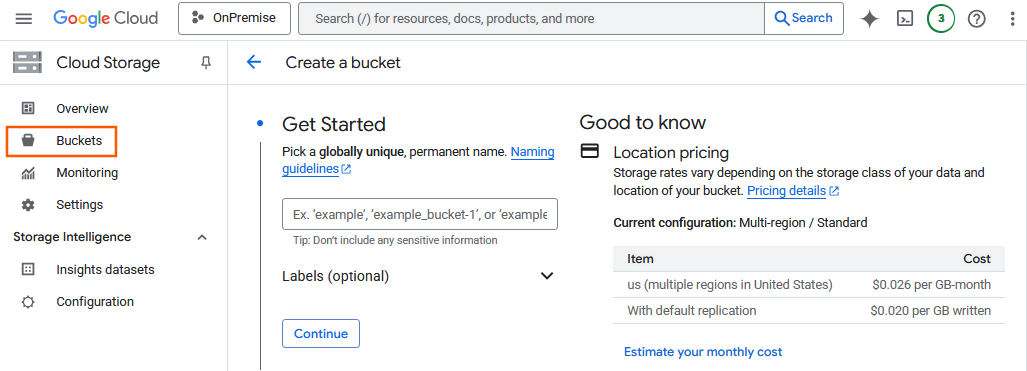
- Configure the settings as required. Provide a unique bucket name (for example, matomo-data-exports) and select the same region as specified for your dataset.
- Click Create to save.
- This bucket will hold your exported CSV or JSON files before loading them into the tables in BigQuery.
Step 6: Export table data and upload to BigQuery
You can export your Matomo data using standard MySQL or MariaDB tools. Make sure your database user has permission to write files, and that the database server has access to the export directory.
- For example, in MySQL Workbench, right click a table and select Table Data Export Wizard to export as CSV or JSON, with options for selecting columns, encoding, and delimiters.
- Specify the location where the export file will be saved.
- Click Start Export and monitor progress. When the processes finishes, it will generate the CSV / JSON file in the specified location.
- Export the data for each table created in BigQuery and save the CSV / JSON files in one accessible folder.
- The next step is to upload the exported table data files to the Cloud Storage bucket.
- Open your bucket in Cloud Storage and click Upload files.
- Select the exported CSV or JSON files to upload. Verify that each file appears in the bucket and is readable.

Step 7: Load data into BigQuery tables
Once the exported files are saved in your bucket, you can load them into your BigQuery tables by setting up a data transfer.
- Open BigQuery and go to Pipelines and Integrations > Data transfers.
- Click Create a transfer and choose the Source Type as Google Cloud Storage.
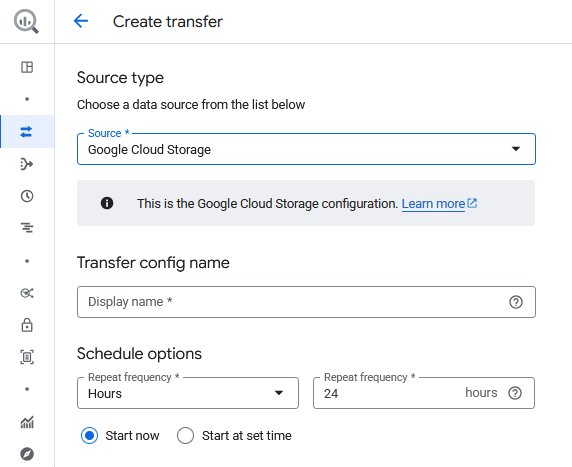
- Provide a Display name, which can be the same as the table name.
- Configure the Schedule options to run the data transfer from the bucket to the table. The data transfer service automatically imports data from your Cloud Storage bucket into BigQuery on a schedule. However, it does not extract or update your MySQL data automatically. To keep your BigQuery dataset current, you must regularly export new or updated data from your Matomo database and upload it to the bucket.
- For the Destination settings, select the Dataset and corresponding table created in BigQuery.
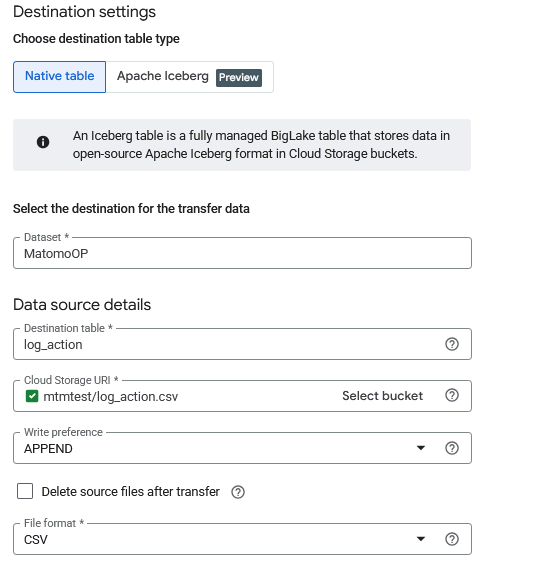
- In the Cloud Storage URI, select the exported CSV or JSON file for the table data saved in your bucket.
- For the Write Preference, you can choose how new data is written to your existing tables:
- Append will add new rows to the table each time the transfer runs.
- Mirror will overwrite the entire table with the new file each time the transfer runs.
- Choose the format of the file in the bucket e.g., CSV or JSON.
- For CSV transfer options, ensure the right Field delimiter is specified (e.g,
;or,) and specify1Header row to skip. - Select the option Allow quoted newlines.
- Scroll down to the end of the form and click Save to enable the data transfer. The data transfer will automatically run after saving.

- To check the data loaded into your table, run a simple select query, for example:
select * from <table> limit 100;
With your Matomo data now stored in BigQuery, you can build custom queries and reports, combine it with other datasets, and perform deeper analysis using SQL or your preferred visualisation tools.